Krobs
- Creative Onepage Responsive Template
- Created: 28/09/2014
- latest Update: 1/11/2014
- By: KWST
- Email: support@kwst.net
Thanks for purchasing tempalte and for supporting my work. Krobs - Creative Onepage Responsive Template. This documentation will not teach you HTML & CSS, it's just showcase of custom elements used in template. This template has 4 versions home section layouts. All versions are divided into folders Also included in the archive selection page version. It is located in the folder "intro" . So for full functionality you should copy template to a local server or host ( to work Ajax portfolio , Video background and contact form).
Files
All site files are divided into folders:
css folder - css files that are responsible for the style themes.
js folder - javascript files.
php folder - php files.
images folder - folder that contains all images.
fonts folder - folder that contains fonts .
twitter folder - folder that twitter plugin .
projects folder - folder that contains the projects files
Colors
By default, Krobs' has a global color - orange ( F56D45 ). To change the color, you must do the following steps:
1. Locate the folder css file color.css and open it with your text editor.
2.In this file, you should find a line responsible for the color theme. Look at the code below.
3. Just replace the six numbers and letters after the lattice in the file "style.css". Forgot to mention the theme color using hex format. If you want to add color format "rgba" then need to remove the lattice. If you do not know where to find the code of the color you click on this link.
@charset "utf-8";
/* CSS Document */
::selection {background: #F56D45; color:#292929; }
::-moz-selection {background: #F56D45; color:#292929;}
 .button  , nav  a span , .arrow-nav a , .home-separator span , .about-button , .custom-skillbar ,   .services-holder li:hover , .serv-overlay , #options li.actcat, #options li:hover , .folio-overlay span, .popup-modal-dismiss  , #contact-form input[type="submit"] , #jprePercentage , .scroll-btn:after , .color-separator , .twitter-holder .customNavigation a , .testimonials-holder .customNavigation a , .clients-holder, .subscriptionForm input#submitButton , .contact-tooltip  , .scroll-nav a  , .about-image .customNavigation a ,.box-details h3:after , .social-list li a:before , #project-page-button a{
	background:#F56D45;
}
::-webkit-scrollbar-thumb , -moz-scrollbar {
	background:#F56D45;
}
.services-holder li  i , .contact-info li i  , .policy-box  a  , .policy-box  i , .error_message , .twitts li a , .num , .resume-head h4 , #testimonials-slider a , .twitter-holder h4 a , .subscribe-holder h4 , #contact-form input[type=text]:focus, #contact-form textarea:focus, input[type=email]:focus , #contact-social  ul li a:hover , .side-site div i  ,  #success_page p{
	color:#F56D45;
}
.page-title h2 span {
	border-bottom:4px solid #F56D45;
}
#project-slider .owl-next{
	background:#F56D45 url(../images/sr.png) no-repeat center;
}
#project-slider .owl-prev {
	background: #F56D45 url(../images/sl.png) no-repeat center;
}
.contact-tooltip:after {
	border-top-color: #F56D45;
}
Structure
All slides must be placed from top to bottom - this will display the active slide in the navigation
General
Images
All images are in the folder "images".
How to add and change the background image
To change the background you can simply change the path in the style rendered in html code, for example :
Icons
All icons are generated by the plugin "Font-Awesome". List of all the icons can be found here.
To change the icon, you have to copy and paste the code icon at the right place for you. Icons size-five . Read the documentation plugin - it is described in detail how to change the icons size. You can also easily change the size of icons using css properties font-size.For example:
Video background
A video is played using YouTube.
To add background video, follow these steps:
1.Open file "index.html" with your text editor;
2. Find the line:
3. Find the line videoURL:'Fr0PocNmtmM', and in single quotes add youtube code
How to find video code?
1. Go to Youtube.
2.Under video click to share.
3. In the screen that appears after http://youtu.be/ copy and replace the code.
And yet the video does not play on smartphones :( - so if a user comes to your site from a mobile browser - the background is replaced by a picture :)
Contact Form
Find the file "contact" in the folder php . In this file, find the line $address = "example@themeforest.net"; and add you e-mail.
How to forward mail to your mailbox ask your Hosting Service Provider. Because providers use different control panel site and I find it hard to predict what you use. Server side script for sending emails is in "contact.php" . Ajax submit is initialized in "scripts.js" file.
Subscribe Form
In this case, you do not need to change anything
To see people who have signed up, simply open the file users-mail.txt . It is located in the folder php . There you will find all the signatories of people email
Server side script for sending emails is in "subscription.php" . Ajax submit is initialized in "scripts.js" file.
// Subscribe ---------------------------------------- $('.subscriptionForm').submit(function(){ var email = $('#subscriptionForm').val(); $.ajax({ url:'php/subscription.php', type :'POST', dataType:'json', data: {'email': email},success: function(data){ if(data.error){ $('#error').fadeIn() } else{ $('#success').fadeIn(); $("#error").hide();} } }); return false }); $('#subscriptionForm').focus(function(){ $('#error').fadeOut(); $('#success').fadeOut(); }); $('#subscriptionForm').keydown(function(){ $('#error').fadeOut(); $('#success').fadeOut(); });
To configure twitter you need to perform the following steps:
1. In file scropts.js finde line :
$('#twitter-feed').tweet({ username: 'yourname', join_text: 'auto', avatar_size: 0, count: 4 });2. Add you name in line username: 'yourname',
3. In folder "twitter" find file index.php It locate the lines:
/*************************************** config ***************************************/ // Your Twitter App Consumer Key private $consumer_key = 'Arl0P3IFQcGFXngB7SVYw'; // Your Twitter App Consumer Secret private $consumer_secret = 'sX9c1Fh8sPiqSuJJUTWdt9pVzOe0wl1jn6mNPZI';4. Add your consumer_key and consumer_secret
5. how to get keys for twitter ? Watch this video. It explains step by step how to get the key
Map
Google style maps generated with this code in the file 'scripts.js'.In it, you can change the color scheme of Google maps, marker coordinates, zoom and coordinates of your location.
Map marker is changed in a row " var companyImage = new google.maps.MarkerImage('images/marker.png', " . You can use the four markers with the seat in the "images" or your marker.// google map styles and functions -------- var map; // your coordinates -------- var krobsmap = new google.maps.LatLng(40.761467,-73.956379); function initialize() { var styles = [ { featureType: 'water', elementType: 'all', stylers: [ { hue: '#cdcdcd' }, { saturation: -100 }, { lightness: 18 }, { visibility: 'on' } ] },{ featureType: 'landscape', elementType: 'all', stylers: [ { hue: '#e8e8e8' }, { saturation: -100 }, { lightness: 18 }, { visibility: 'on' } ] },{ featureType: 'road', elementType: 'all', stylers: [ { hue: '#fdfdfd' }, { saturation: -100 }, { lightness: -1 }, { visibility: 'on' } ] },{ featureType: 'road.local', elementType: 'all', stylers: [ { hue: '#fdfdfd' }, { saturation: -100 }, { lightness: -1 }, { visibility: 'on' } ] },{ featureType: 'poi.park', elementType: 'all', stylers: [ { hue: '#c0c0c0' }, { saturation: -100 }, { lightness: -3 }, { visibility: 'on' } ] },{ featureType: 'poi', elementType: 'all', stylers: [ { hue: '#c0c0c0' }, { saturation: -100 }, { lightness: -3 }, { visibility: 'on' } ] },{ featureType: 'transit', elementType: 'all', stylers: [ { hue: '#ffffff' }, { saturation: -100 }, { lightness: -9 }, { visibility: 'on' } ] } ]; var mapOptions = { zoom:17, zoomControl: true, scaleControl: false, scrollwheel: false, disableDefaultUI:true, center: krobsmap, mapTypeControlOptions: { mapTypeIds: [google.maps.MapTypeId.ROADMAP, 'bestfromgoogle'] } }; map = new google.maps.Map(document.getElementById("map_canvas"), mapOptions); var styledMapOptions = { name: "krobsmap" } var jayzMapType = new google.maps.StyledMapType( styles, styledMapOptions); map.mapTypes.set('bestfromgoogle', jayzMapType); map.setMapTypeId('bestfromgoogle'); var companyImage = new google.maps.MarkerImage('images/marker.png', new google.maps.Size(64,64), new google.maps.Point(0,0), new google.maps.Point(64,64) ); // your marker coordinates -------- var companyPos = new google.maps.LatLng(40.761467,-73.956379); var companyMarker = new google.maps.Marker({ position: companyPos, map: map, icon: companyImage, zIndex: 3 }); }How to find the coordinates of Google maps ?
1. Go to Google maps
2. LEFT-click on the place that you want coordinates for.
3. Notice that there is a small circle which radiates at that place, or the nearest on-street place.
4. In the top left of the map, a small display box appears, showing the address and lat/long coordinates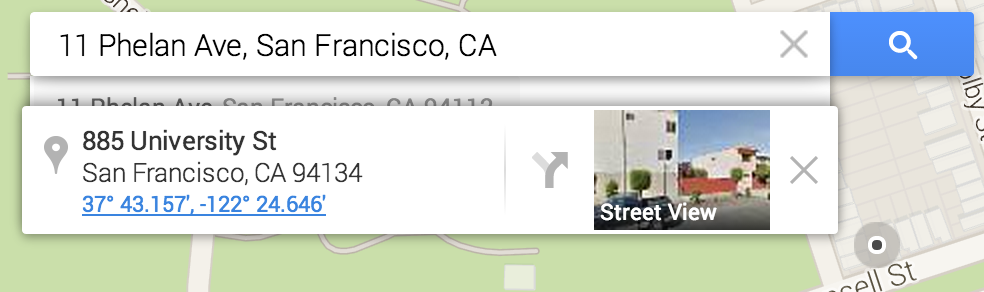
You can copy / paste these as text.
if you have all the same did not happen to get the coordinates, click on this link. And by simply clicking on the map in the first top form you receive the coordinates
Sources & Credits
Fonts
http://www.google.com/fonts
Photo
Unsplash
http://unsplash.com/
Grovemade
http://grovemade.com/
Ugmonk
http://www.ugmonk.com/extras/lookbook/#
Icons
Font-Awesome
http://fortawesome.github.io/Font-Awesome/
JQuery
http://jquery.comJQuery Easing
http://gsgd.co.uk/sandbox/jquery/easing/OwlCarousel
http://www.owlgraphic.com/owlcarousel/MIXITUP
http://mixitup.ioSwiper - Mobile Touch Slider CSS
http://www.idangero.us/superslides
https://github.com/nicinabox/superslidesTextillate
http://jschr.github.com/textillateMagnific Popup
http://dimsemenov.com/plugins/magnific-popup/
Thanks
Thanks for purchasing template and for supporting my work. If we fail here in this documentation, please e-mail me support@kwst.net. If you have a spare time, please go and rate my template. I will apreciate that.
Thanks